

Embedded forms can easily be added into your own website so you can receive enquiries or viewing/meeting bookings directly from your website in Sonas. Enquiry forms will create a new enquiry, while appointment forms link to calendar availability that you define. See: Defining Venue Availability for Appointments to learn more.
If you cannot see this section or get permission denied messages with any of the actions, please contact your Company Admin in order to get the required permissions.
Video
Setting up your Form
- Navigate to Company > External Forms
- Click on Actions > + New External Form (Learn how to clone existing forms at the bottom)
- Name your new form, select the type of form (Enquiry or Appointments), and SAVE. You will be redirected to a screen to create/edit the form.
- General, you can edit the name and edit the form here.
- Form Fields, decide what data your form will request. First, the default mandatory fields are listed, followed by additional optional fields to add. In addition to Venue, Enquiry forms have 4 required values that can't be removed: Name, Surname, Email and Submit. Appointment forms have 6 required values that can't be removed: Name, Surname, Email, Appointment Date, Appointment Time, and Submit. Fields can be reordered via the green arrows and removed via the red delete icon. Optional fields can me made mandatory for the customer or not, if mandatory, the form cannot be submitted without completing.
- Available Venues, mandatory, this will not appear if only one venue is selected. If using multiple venues, you can select check boxes or a multi select dropdown. You can edit the label as required and set an initial selection, so it defaults to what you want the customer to choose.
- Name, mandatory, your customer's first name. You can rename the label and optionally have an example as Placeholder Text.
- Surname, mandatory, your customer's surname. You can rename the label and optionally have an example as Placeholder Text.
- Email, mandatory. You can rename the label and optionally have an example as Placeholder Text. This is the email where the auto reply or future emails will be sent. It is also the customer identifier.
- Submit Button, mandatory, what the customer clicks to submit the the form. You can rename the button to meet your needs, i.e. Request Brochure.
- Message box. Select multiline or single line. Label as you wish and optionally add placeholder text, such as examples of what you want that space used for.
- Company, for the customer's company name, useful for corporate enquiries.
- Phone, you can label is as mobile if you would like.
- Email Confirmation, if you want the email entered a second time.
- Date(s) desired, for the event, use Placeholder text to show examples of what you would like to see.
- Event Type, if you only have one choice, the field will not be shown on the form and all submissions will default to that one event type.
- Heard About Us, add any options that you have set up for your company.
- Marketing Consent, this allows customers to opt-in to receive marketing emails from you. Please see Marketing Permissions for more details. You control the wording to encompass what you want to secure consent for. This field should be placed above the submit button. You can select drop down or check box. You can have it set to accept and they can uncheck the box to opt out.
- Budget, ask for customer's initial budget, this will populate the General section of their Enquiry.
- Amount of Guests for a general guest number estimate. It will populate the estimate adult day guest section of the enquiry.
- Accommodation is a text box for accommodation needs of the customer. You can choose single or multiline of text and use the Placeholder Text to give an example of what you would like to see. This will populate the Accommodation Notes in the Enquiry's General section.
- Partner Name, Surname, Email and Phone. If all three are complete, it will populate the people section with the email turned off. A staff user will have to activate the email if you want the partner to receive email.
- Custom Text Field, these are additional text fields (up to 5) that you can map to your venue's custom fields, meaning you connect to a custom field and that is where the information will populate. For example, Pets Included or Car Registration. There can be multiple. Custom Fields
- Auto Reply with Templates, assign the auto reply template for each venue, so be sent upon form submission.
- Analytics
- Enquiry Source, assign an enquiry source (from your company list of enquiry sources) to assign to the form.
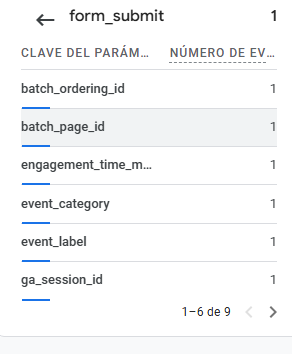
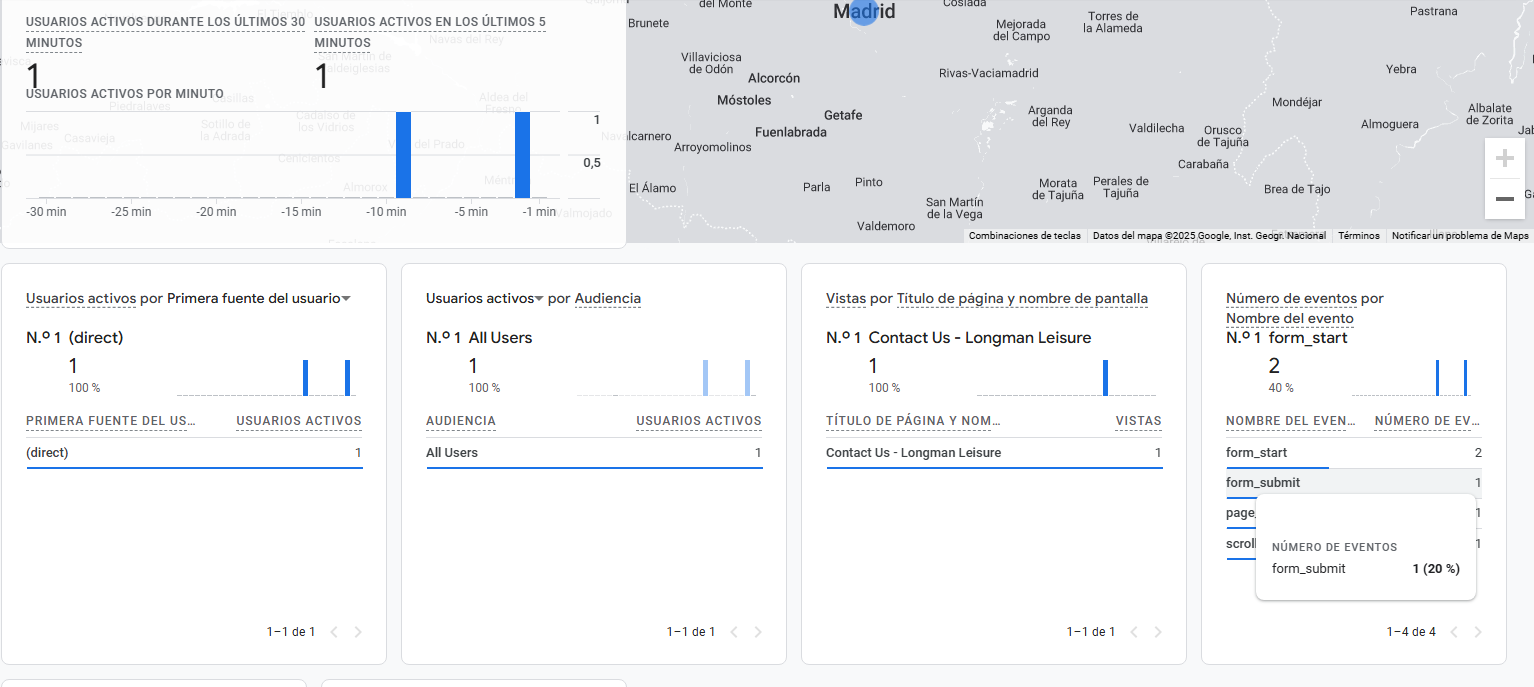
- Send a GA4 Event after submit. The event looks like this (see below for more info):
- Event: form_submit
- Category: Sonas
- label: form name (taken from Sonas)
- Redirect URL after submission, put any URL to redirect potential new customers after they submit a form, such as a thank you page, a page with your online brochure, etc. Leave blank for a default message of submission success.
- Styling
- Form Style, ff you use a common UI Framework on your website, you can select it here to generate compatible styling automatically when you save the form. If your framework is not available, you may need to reach out to your IT department or webmaster to assist with styling. Alternatively, you can select Default Styling. This will gives you a clean, simple form layout that works straight out of the box.
- Switch to Single Column Layout On By default, forms will display in a two-column layout that automatically reduces to a single column on mobile, you can override this for different screen sizes.
- Custom CSS, place any CSS here to style your form. You also have Additional Classes fields for each data field to apply CSS. This allows your to style your form to match your website with font, colours, etc. Please note that you can add CSS elements as Additional Classes to each form field.
- Anti Spam, Sonas forms use reCAPTCHA V2 invisible to prevent spamming. Leave blank to use our default Site Key and Secret Key. If you already have reCAPTCHA V2 invisible on your site, please enter your site specific Site Key and Secret Key here.
- Load Form only on Specified Domains, if you want your contact form to be only accessible from certain websites, you can define the root domain from those websites here (e.g. mywebsite.com or subdomain.mywebsite.com). If you add a root domain, there's no need to add subdomains of the same domain. If no domains are specified, your form will load from any website.
Installing the Form on your Website
- Once your form is ready, it is time to change the value of "published" to YES and SAVE changes. Under Actions (upper right hand corner), select "Add to your website". A snippet of code will pop up for you to copy and paste into your website to load the form.

- Paste the form code to your website’s source code where you have your site hosted (WordPress, SquareSpace, etc.). Alternatively, provide the code to your IT Department or Webmaster and they will be able to assist you.
Troubleshooting your Form
To check that the form is loaded on your website and that the messages go through by sending some test data as a first message.
ReCAPTCHA Issues
- Navigate to the URL where you have installed your code snippet. You should see something like this:

- If you can't see the form, please check if you included the domain you have the snippet on in Allowed Domains (see above).
- If you see the form but can't submit, please ensure your Google Captcha code is correctly installed and the domain is listed with your reCAPTCHA setup.
- If you have other items on the page using reCAPTCHA (v2 or v3), please see Using V2 and V3 on the same page.
- If you previously had non-Sonas Forms, be sure all associated code is removed.
Elementor Pop-up Not Loading Forms
If you use Elementor and want a pop up form for the Sonas form, there are issue related to the library the website is using to create popups. Basically, Elementor is trying to run the Sonas code before the modal is fully available on the website. This can cause some issues and make it not load most of the times.
The recommended way to make it work is to apply custom javascript code, so the Sonas code in "https://app.sonas.events/formswidget.min.js" is only loaded once the popup is visible.
Depending on the Elementor version you have, you might need to use different instructions to make it work, but here's an official link for version 2.7+ that you can try:
https://developers.elementor.com/elementor-pro-2-7-popup-events/.
Form still not loading
Be sure you are not placing the form in an iframe. Place in regular div.
Ensure the form widget is only added once.
Adding 2 forms to one page
If you want to add two forms in the same page, there are a few steps to take to ensure the work correctly.
When you paste the snippets they should do it like this:
CODE OF THE PAGE
<div class="sonas-form" data-form-id="form1" data-tenant-id="XXX"></div>
MORE CODE OF THE PAGE
<div class="sonas-form" data-form-id="form2" data-tenant-id="XXX"></div>
AFTER THE SECOND ENTRY OF THE FORMID2 AND ADD THIS ONLY ONCE
<script type="text/javascript" src="https://app.sonas.events/formswidget.min.js" defer async></script>
Tracking Blocked
Be sure you are not placing the form in an iframe, this will block tracking.
Clone/Duplicate Forms
- You can duplicate forms with ease by going Actions > Clone Forms in the External Forms section.
- Be sure to rename your form and make any necessary changes such as venue and associated automatic replies.