

Setting up Areas is a vital part of your venue's configuration in the system. The feature has two primary functions: scheduling event spaces and creating detailed floor plans.
Firstly, defining distinct areas—such as a ceremony room, a reception hall, or a dining area—is crucial for managing your event calendar effectively. When creating a booking, you will assign the relevant areas for that event. This allows you to confidently host multiple, non-conflicting events at the same time. Alternatively, you can grant a client 'exclusive use' of the entire venue.
Secondly, to take full advantage of our advanced layout planning tools, we recommend uploading floor plans for each area. By including details of your available furniture, you and your clients can collaboratively design the perfect layout, arranging tables, chairs, and other fixtures to visualise the event space precisely.
Video- Areas
Video- How to use areas for multiple events in one day
Video -Uploading your SVG floorplans
Creating and Editing Areas
Venue > Areas and Fixtures
There are 3 tabs on this screen: Areas, Fixtures, and Default Layouts
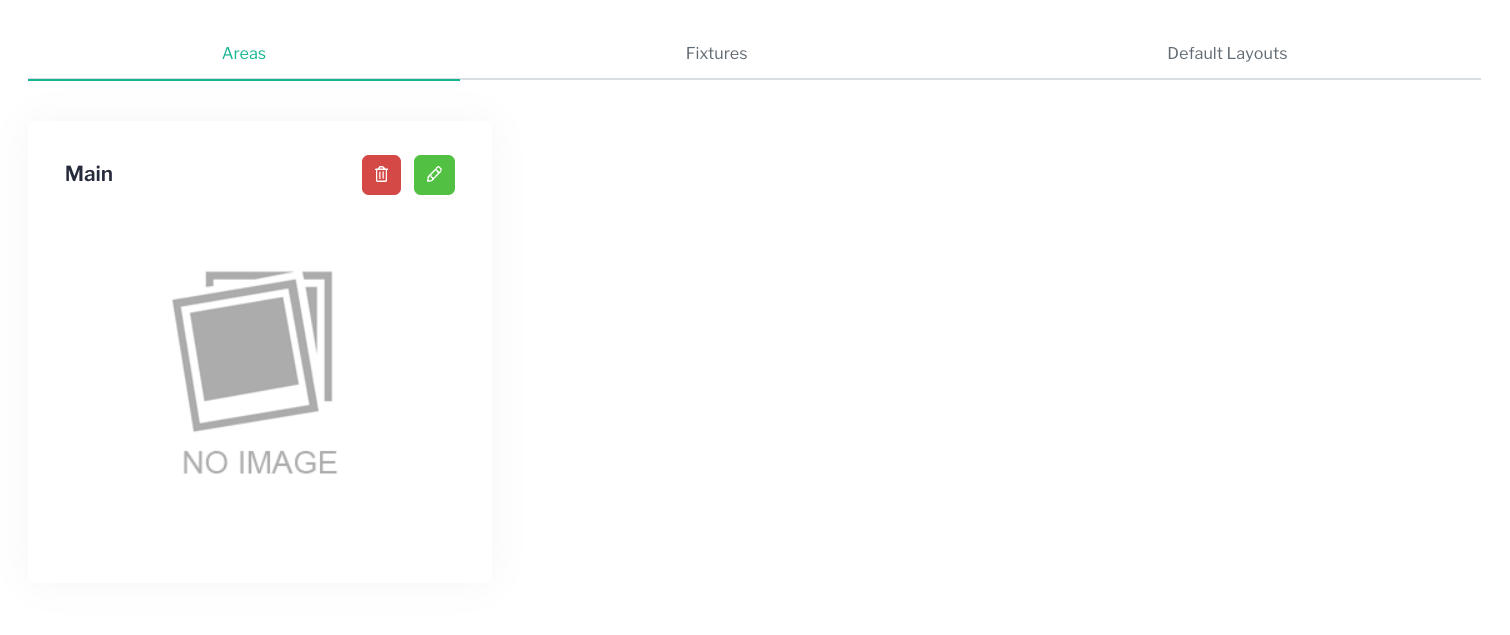
By default, your venue is set up with a single area named 'Main'. To customise this, or any other area you create, click the green pencil icon next to its name.
Note: If you do not plan to use the multiple Areas feature, please leave the default 'Main' area in place. The system's scheduling wizard requires at least one area to be available for selection.
On the edit screen, you can configure the following settings:
Name: Change the name to match the specific room or location within your venue (e.g., 'The Orangery', 'South Lawn').
Floor Plan Dimensions: You have two options for defining the area's layout:
Basic Plan: For simple planning, enter the Width and Height of the room in the fields provided, in millimeters.
Advanced Plan: For a detailed layout, you can associate the area with an SVG floor plan file that you have uploaded to your Venue Documents. Please see our Document Uploads guide if this has not yet been completed.
Important: When using an SVG file, the Width and Height you enter must match the aspect ratio of the image file, not the real-world dimensions of the room. Please contact your Sonas Customer Success Representative for assistance if you are unsure.
Background Colour: You can optionally select a background colour for an area. This helps to highlight events using that specific space on your calendar.
Please note the following behaviours for area colours:
An area's colour will override any default colours set for the venue or the event type.
The colour is only displayed on the calendar when a single area is assigned to an event. It will not appear if the event is marked as 'exclusive use' or has multiple areas assigned to it.
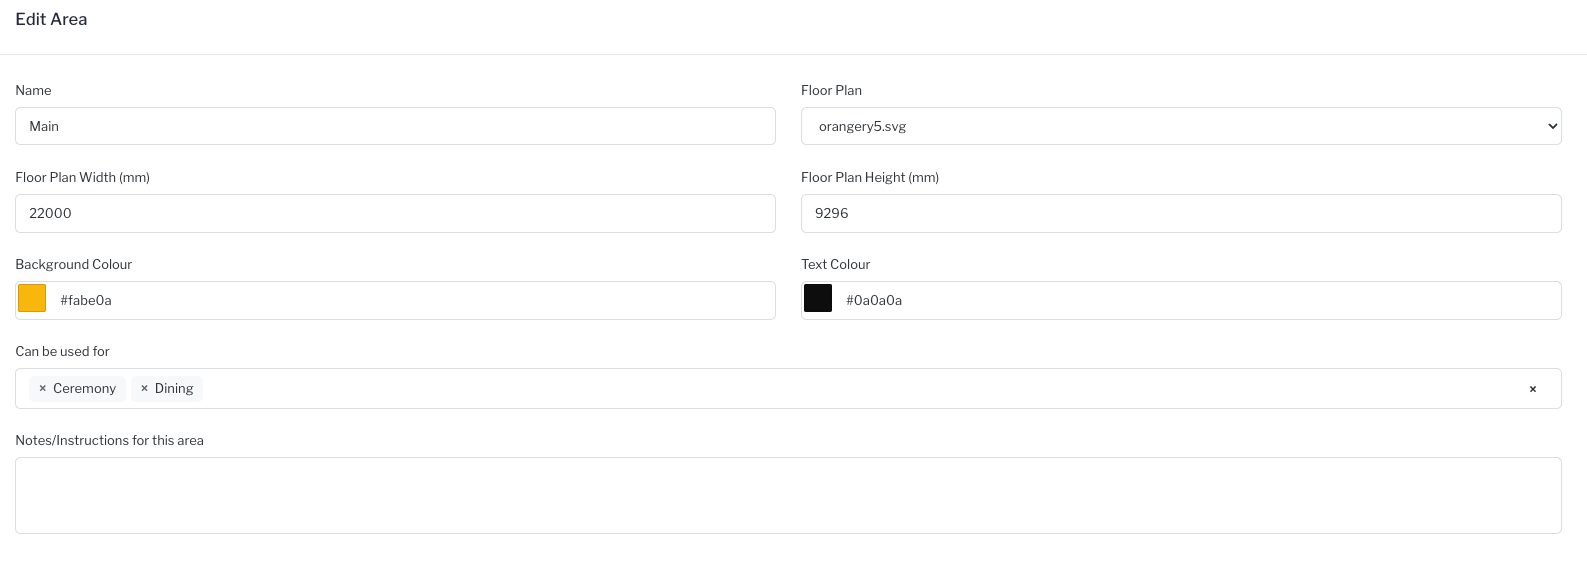
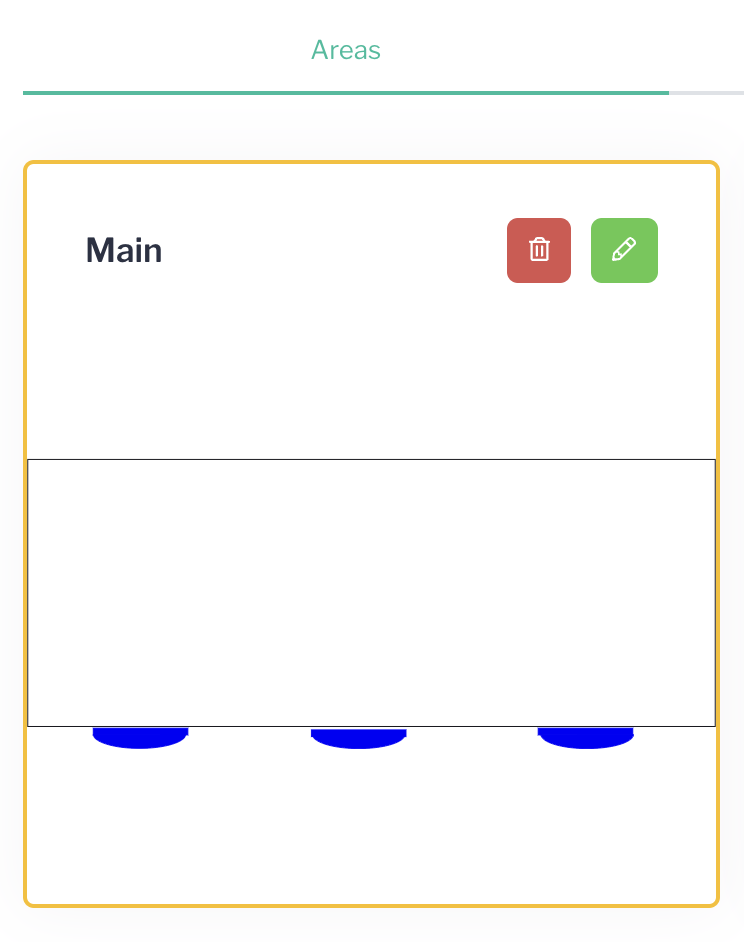
The assigned colour will also outline the area in the area list to remind you of its colour, orange in these examples.
Can be used for: Select the designated functions for this area by ticking the appropriate boxes: Ceremony, Reception, and/or Dining. These are the three core event components for which an area can be officially booked. Any other activities or uses for a space (e.g., 'Meeting', 'Prep') should be defined within the event's Timeline.
You can add as many locations as offered by the venue, click Actions > + Add New Area.
Fixtures
Video- Fixtures
Managing Fixtures
The Fixtures section is your inventory list for all physical items—such as tables, chairs, and other furniture—that can be used when designing event layouts.
By default, the system includes three examples: a top table, a rectangular table, and a round table. You can amend or delete these examples and replace them with the specific fixtures available at your venue.
To view or change the details for an item, simply click on it. You can configure the following information for each fixture:
Name and Type: The name of the item and its category (e.g., '6ft Round Table', Type: 'Table').
Capacity: The number of people that can be seated at the fixture.
Quantity: The total number of this specific fixture you have available.
Description: An optional summary that will be visible on the main Fixtures screen.
Allowed Areas: Specify in which of your venue's areas this fixture is permitted to be used.
Assign Number: Tick this option if the fixture should be assigned a number in event plans (essential for table number assignments).
Staff Only: Select this option if you want the fixture to be available for staff users only and not for customers via the portal.
To add a new item to your inventory, click Actions > +Add New Fixture.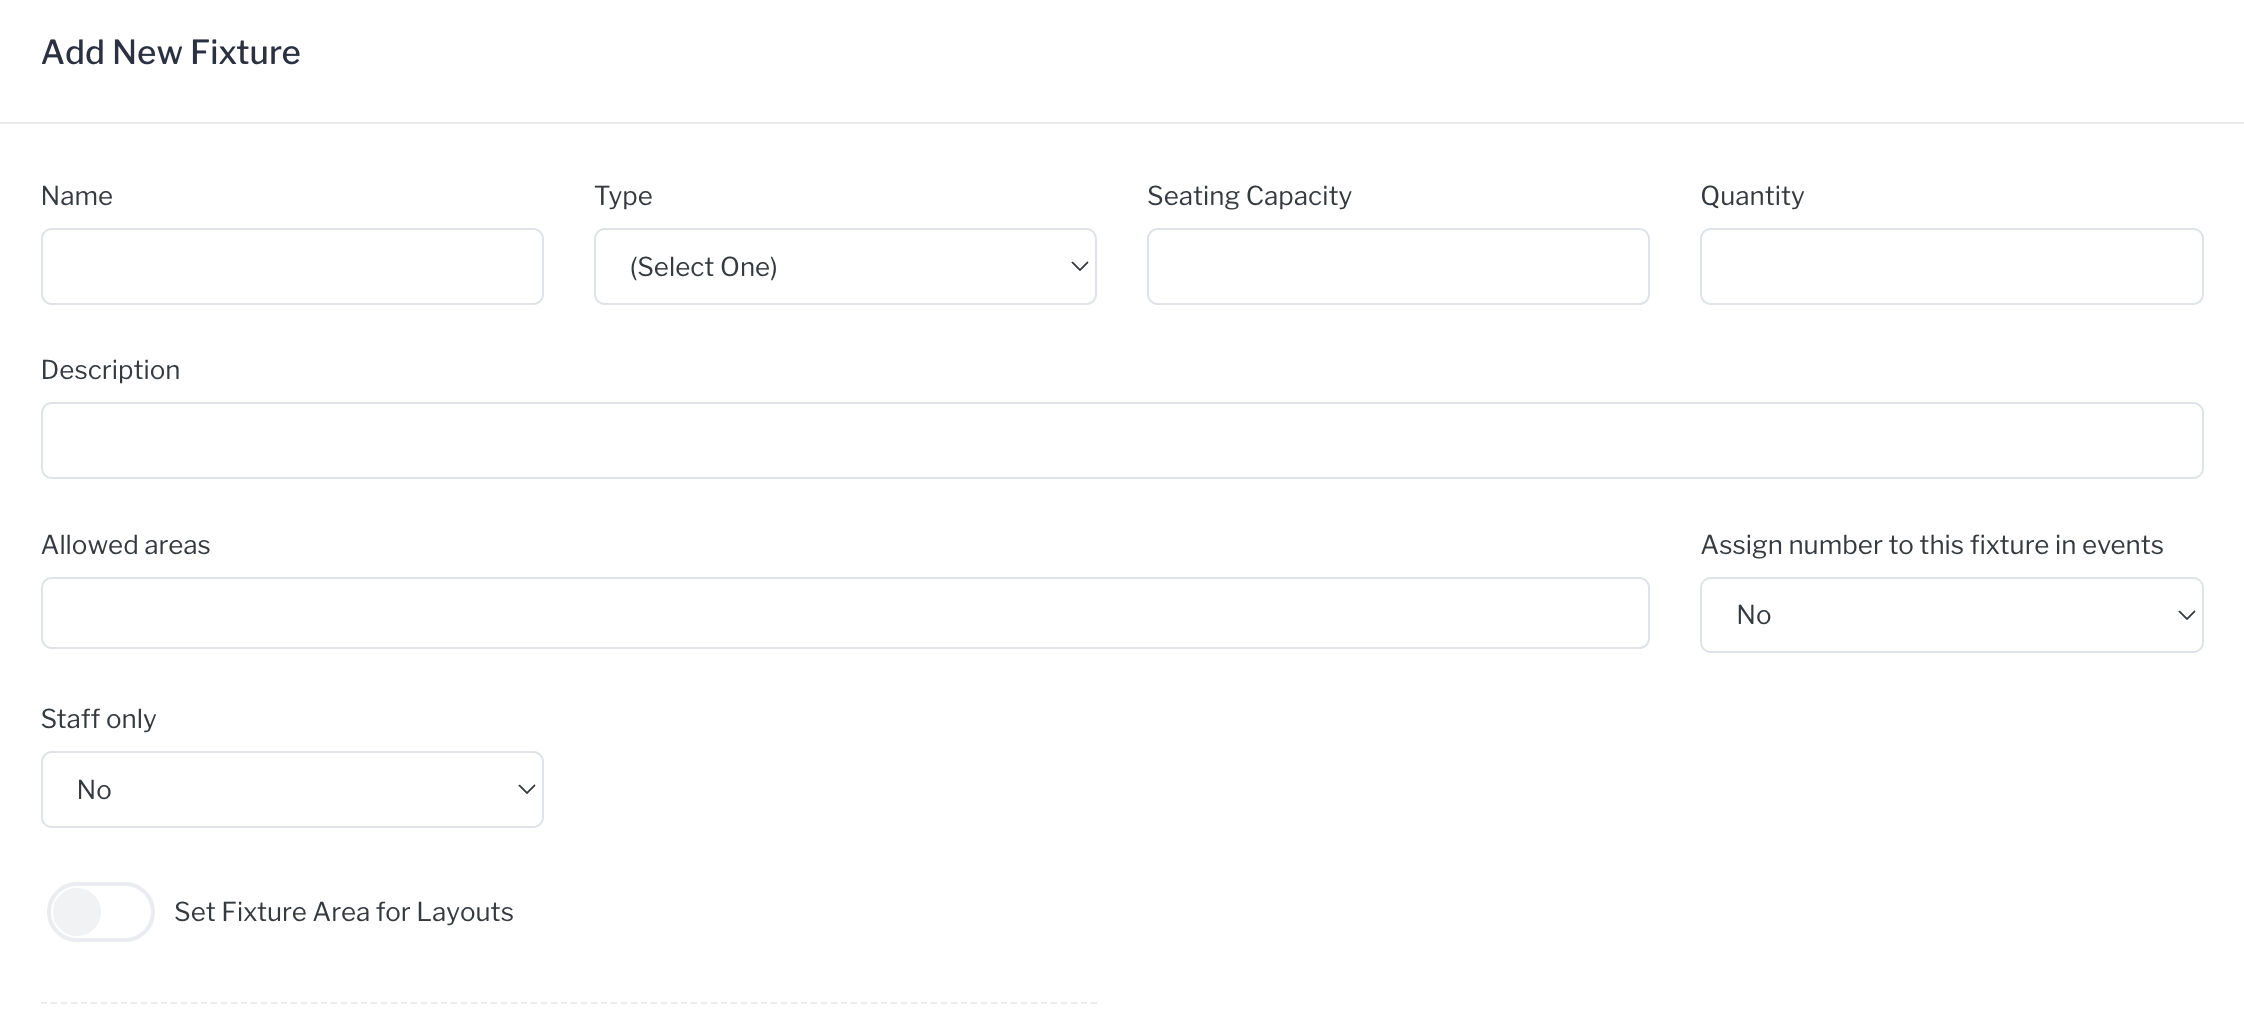
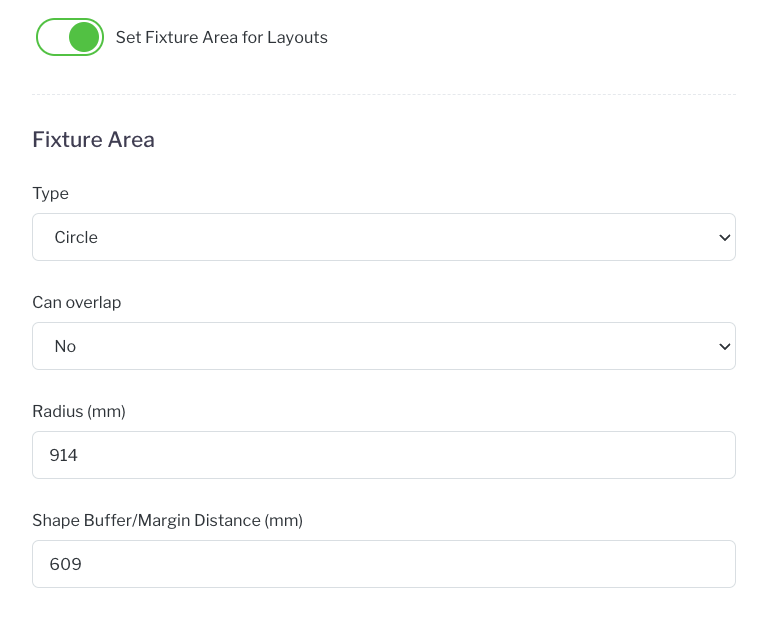
Setting Fixture Dimensions for Layouts
For advanced floor planning, you can define the precise dimensions of each fixture to ensure it is accurately scaled on your layouts.
At the bottom of the fixture's settings, tick the checkbox labelled Set Fixture Area For Layouts.
This will reveal additional fields where you can enter the item's specific Width and Height.
Completing this step is essential for using the floor plan designer. It ensures that each fixture appears true-to-scale when placed on a floor plan in the Layouts section, allowing for accurate and realistic event design.
Shapes, and Spacing Explained
When adding a new fixture, you'll need to define its shape and size.
Type: Choose between a circle or a rectangle (which includes squares).
Can Overlap: This setting determines whether fixtures can be placed on top of one another or if they must respect each other's dimensions when you're arranging them.
Size: For rectangles and squares, this is defined by length and height (or depth). For circles, the measurement is the radius (half of the diameter).
Shape Buffer/Margin Distance: This is a crucial setting that adds a margin around a fixture, creating necessary space for things like walkways and chairs. For example, if you set a 609mm (2-foot) buffer on all tables, the total distance between two tables will be 1219mm (4 feet), room for guests, chairs, and staff.
Note: If you're arranging rectangular tables side-by-side to create a longer one, it's best to disable the buffer, as it's applied to all four sides and would create unnecessary gaps. Alternatively, you can manually enter all table configurations. For instance, if you allow butting two 6-foot tables together to create a 12-foot banquet table, simply enter a new fixture for the 12-foot configuration. This approach allows you to effectively utilize the buffer tool for that specific arrangement.
Deleting and Restoring Fixtures
You have the ability to delete fixtures from your account. To prevent disrupting completed and confirmed events that have used a specific fixture, we archive them rather than deleting them permanently. Fixtures that have never been used, however, will be permanently deleted.
To Delete a Fixture
Open the fixture you wish to remove.
Click Actions > Delete.
The fixture's status will change from active to deleted, and it will no longer be available for new allocation.
To Restore a Fixture
On the main fixture list, change the status filter to Deleted to view all archived fixtures.
Click on the deleted fixture you want to restore.
Click Actions > Restore.
The fixture will now be moved back to your active list.
Default Layouts
Layouts bring together your venue’s areas and fixtures to create detailed floor plans. They provide a default starting point for each of your venue's areas, which can then be customised by the customer as part of the planning process. Using these pre-built templates gives you and your clients an excellent base to work from.
Note: To ensure accurate layouts, you must have your areas set up with either an SVG file or by entering the measurements when creating the area.
Video- Creating Default Layouts
Adding a New Layout Template
To add a new default layout template, simply click on Default Layouts, then select Actions > + Add New Layout.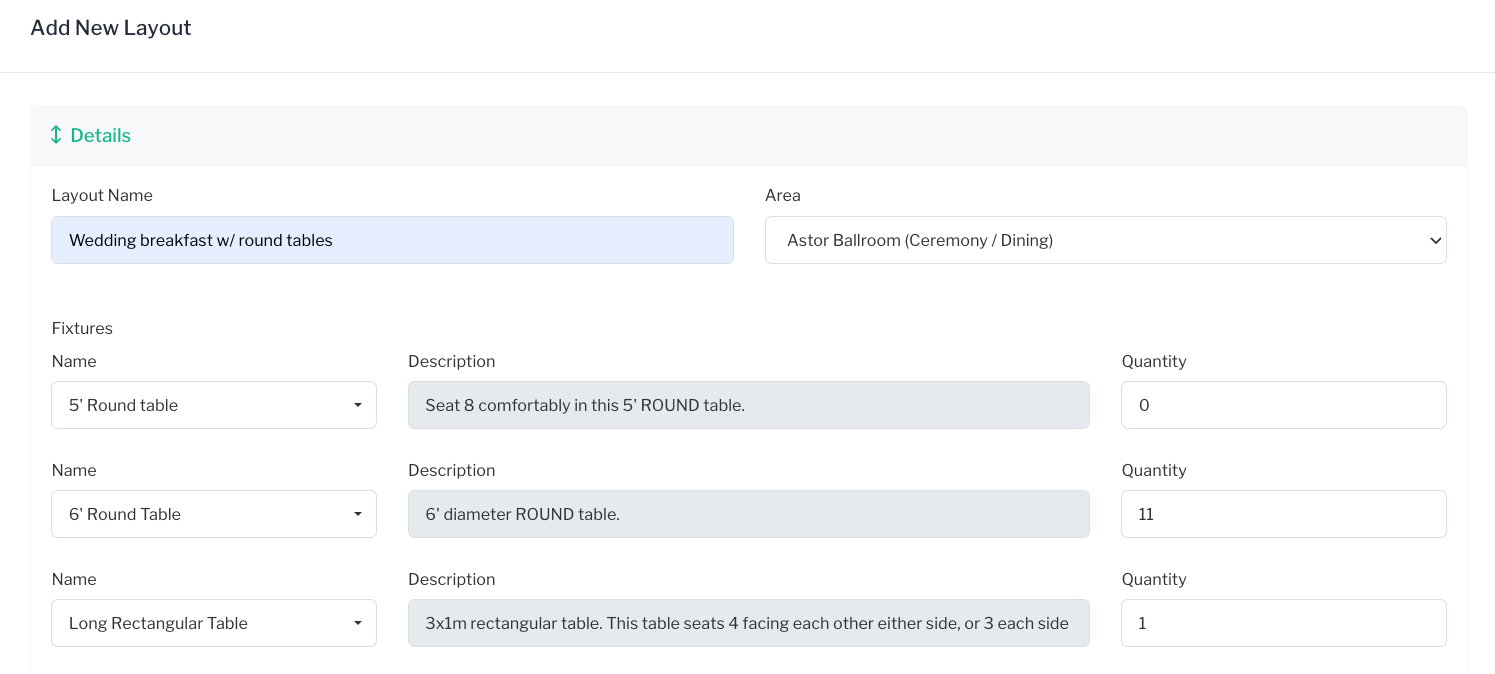
Next, fill in the details, including the Layout Name and Type. You'll also need to select the quantity of each fixture to be included in that specific area.
Note: If you don't see a particular fixture, check its settings as it may not be allowed in that area.
Once you have completed the details, click SAVE.
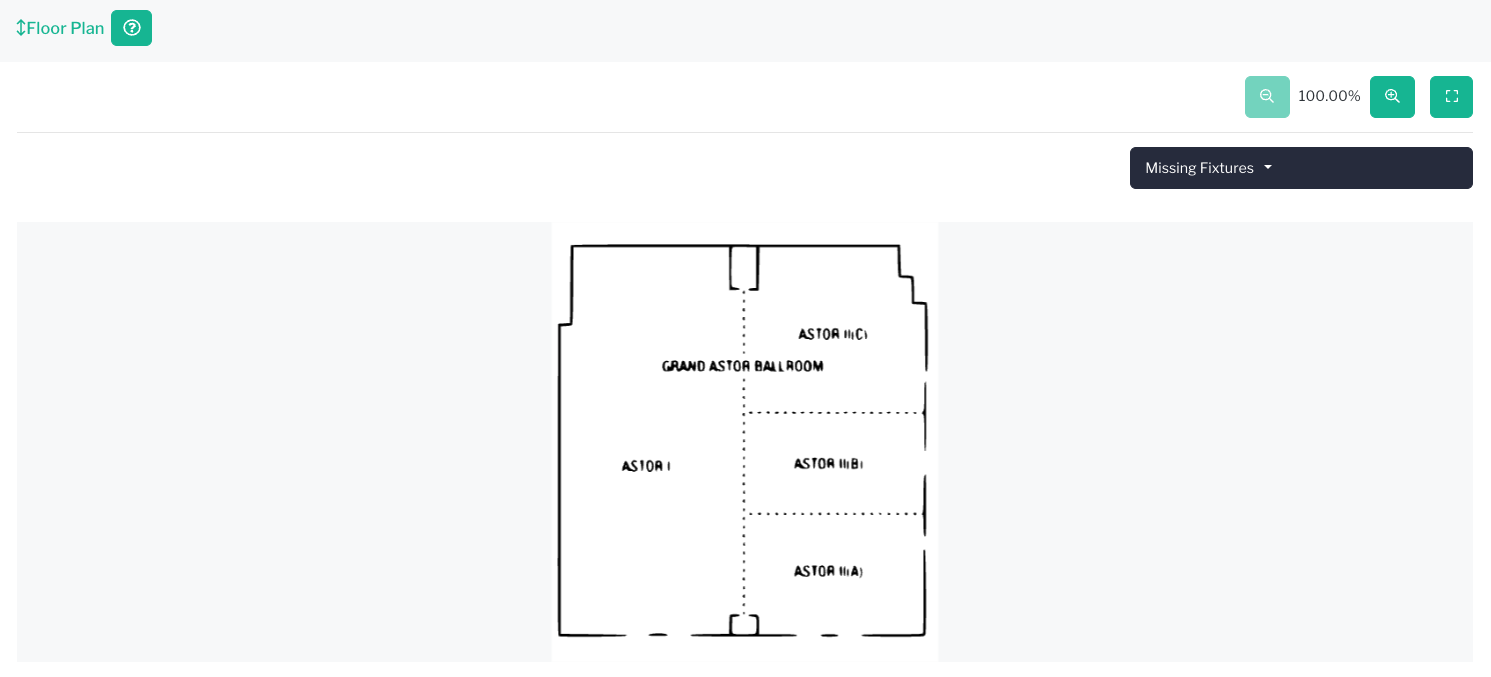
Editing the Floor Plan
After saving, the empty Floor Plan will appear at the bottom of the screen.
Click on Missing Fixtures to add the tables and chairs included in your layout's fixture list.
Drag and rotate the fixtures onto the floor plan as you wish to create your default layout.
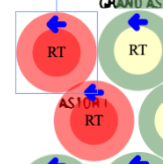
The yellow outline shows the fixture’s actual dimensions.
The green outline indicates the pre-determined buffer, if used.
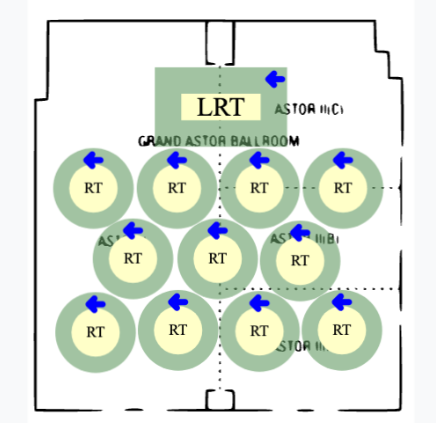
If a fixture turns red, it means it is too close to another item. You'll need to adjust its position.
To rotate a fixture, click on the light blue box associated with it.
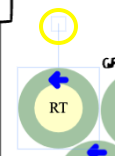
The blue arrow on each table indicates the position of seat #1 and the direction that seating continues. This is particularly useful for events where seating is assigned to a specific seat, not just a table.
Note: There is a legend below the layout to help you identify each fixture.
Once you are happy with your layout, click SAVE.
For information on how to use this default layout for specific events, please see Submenu: Guests.